
DIY balloon arch decoration is a popular choice for events, especially when you want a beautiful balloon arch that instantly upgrades your party decoration. It not only looks stunning but also has different functional purposes. You can use it to embellish the entrance to the event or one of its thematic zones, make your delicacy-bar design more eye-catching, or even create an emotional photo background as part of your larger balloon decorations.
Keep in mind that there are different ways of creating a balloon arch. Choose the frame that works best for your style, consider the balloon colors you want to use, and just follow our easy DIY balloon arch instructions in this balloon arch tutorial to achieve a professional-looking result.

Balloon arch tackle. Everything you need to make a balloon arch
Balloon arch with frame tackle
Varicolored balloons (depending on your idea). You’ll need about 20 large, 30 medium, 40 smaller balloons per cadence; balloon pump, which will speed up the process of inflating balloons and make it much easier; string or fishing line; balloon strip; various items for decorating frame attachment points.
DIY balloon arch frame tackle
Get a flexible tube to produce the frame and two heavy objects (cinder block or bucket). A ready-made structure will be installed in them, making it easier to assemble a balloon arch even if you’re following an easy diy balloon arch method.
Simple balloon arch tackle
Latex balloons of different colors and sizes; balloon pump; thin beading line; low-temp cement gun; command hooks or a pegboard - perfect when you want a straightforward build without a full step-by-step guide.
Note that an arch with a frame can be installed far and wide (it is a standalone construction), while a simple arch has to be fixed with command hooks or a pegboard.
Depending on your idea, you may also need colorful embellishments like fresh flowers, pompons, tassels, etc.
DIY balloon arch instructions
Before telling you how to make a balloon arch step by step, we have to note that you should use only high-quality latex balloons, as cheap models won’t survive twisting and burst at the most unhappy moment. Quality balloons guarantee that your arch will look great both before, during, and after the party!Let’s find out how to make a balloon arch with a frame.


How do you make a balloon arch with a frame?
Inflate balloons
Use the pump to inflate your balloons. To ensure that all balloons are the same size, make the same number of strokes on the pump handle. But there’s indeed a better option: make an estimation device for measuring balloons using cardboard with a hole cut in it — a useful trick often mentioned in balloon arch tutorial guides.
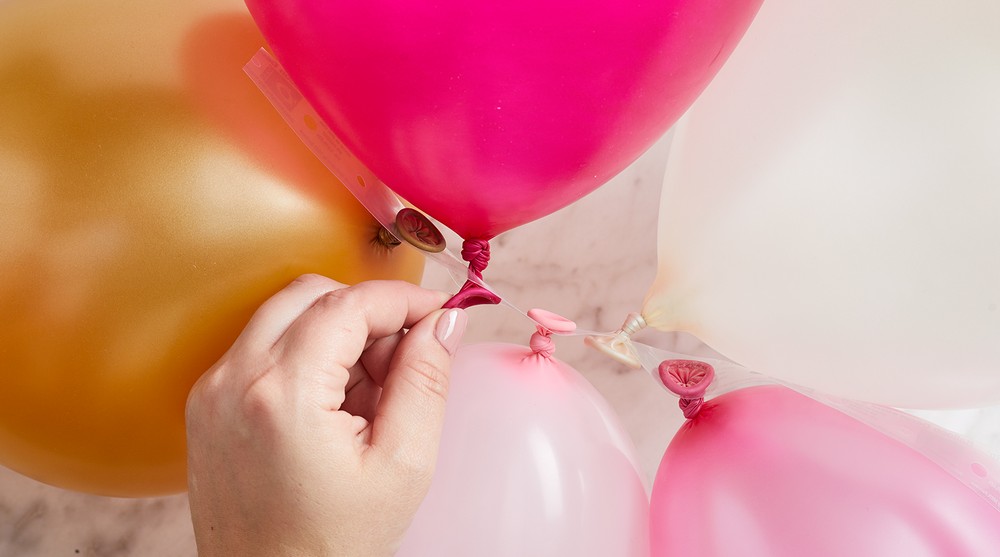
Twist the pairs of balloons
Next, take two balloons and start tying their necks together. You won’t need threads for this, since the necks are relatively thick and tightly fixed when tied together.
Still, tie a string or fishing line between them, and also twist balloons in the clockwise direction, if you want to securely fix these two balloons.
Twist the pairs of balloons with each other
Now you need to tie pairs of balloons together to make a four-balloon element. To do this, twist them crosswise, right in the middle. Now you have the basic element of the future arch, which you will later use to assemble an air arch with uniform density.
Repeat this with all pairs of balloons.
Tie each element of four balls with a fishing line or thread so that the balloons fit snugly against each other.
How to make a balloon arch frame?
Now you need to assemble the arch frame. This option is suitable if, for example, you plan to move your arch. Also, it's a stylish option for outdoor fests - the frame will allow you to securely fix the structure. To make the frame, take a flexible plastic pipe. Its length depends on the height of the arch (no more than 16 ft).
Fix the frame
You’ll have to securely fix the frame on the ground using special holders (you can find them in any tackle store). But there's another option: take two identical flower pots (or any other holders with a height of at least 15”), alabaster (gypsum), and water. Pour the alabaster mixture into the pots, dip the ends of your arch frame into it, and let the foundation harden.
When you are done, do not forget to embellish the pots nicely!
Fix the balloons to the frame
The balloons should conform to the shape of the frame, so first, attach a lot of balloons to the frame to see how many of them you'll need. Many creators also prefer using a balloon strip to simplify even distribution.
Place the bunches of four balloons on the bottom of either side of the frame and secure it. This can be done using vestments, special silicone drops, or by twisting the tails of the fastened “balloon quartets” around the frame.
String the balloons on the frame in a checkerboard pattern. The main thing is that the balloons are tight enough to each other, there should be no empty spaces. This way, the arch will be more substantial and will have a more complex and intriguing composition.

How to make a simple balloon arch step-by-step
Inflate balloons

Before you start inflating the balloons, decide on the number of balloons, the size you want your arch to be, and the color scheme.
String balloons on the fishing line. Cut the fishing line (the length should match the size of your unborn arch — plus leave a free section of 18” at each end of the line).
One by one, string the balloons on the line, using its end to pierce the neck of each balloon below the knot. You’ll get the effect of a tapering arch if you string lower balloons closer to both ends of the line. Continue threading the balloons on the line until you get the necessary size of the balloon composition. This method is perfect when you want to create a balloon garland without needing extra tools.
Fix the command hooks

There are two options: you can either attach the command strips to one of the walls of the room, or you can use the pegboard.
Also, place one hook against the top of the arch; place two other hooks closer to its ends (about 15” lower than the hook in the middle (yet, this depends on your idea). Keep in mind that the other two hooks should be placed at a certain distance from each other (depending on the length of your composition).
Fix everything to the hooks
Everything is simple: attach everything you've made before to the hook in the middle, and also attach the ends of the balloons to the other two hooks. However, just wrap the ends around the external hooks if the construction is longer than you expected.
Make a balloon arch

Shape the arch with your hands (just fluff it up a little). In any case, there will be many empty spaces on the arch that will look unattractive. Inflate the lower balloons and use low-temperature glue to fill in the gaps in the arch. This is a useful technique that will help you achieve a stunning effect.


How to add newness and originality to your arch
Are you happy with the result and suppose your balloon arch looks great?
But you shouldn’t stop there, as you can always make a balloon arch decoration indeed more attractive as if it was created just for your festivity! Just get creative and use colorful decorations, which are easy to find at home or in the nearest store.
Embellish your arch
Use natural or paper flowers, pom-poms, tassels, leafage, or lists, and give your arch a special touch. The flashback is that if you use fresh flowers with greenery, you need to embellish the arch right on the day of the festivity so that they look fresh!
Play with trendy colors
Pay attention to trendy colors like Light Blue, Fuchsia Fedora, Sage Green, Bluish Green, Gold, Ultimate Gray, Mint, Raspberry Sorbet, Desert Mist, Leprechaun, Pale Ensign, and numerous other colors.
Also, do not go too far with eccentric color duos!
Stay flexible
Choose from numerous available arch shapes (classic arch, square, heart-shaped installation) or try a completely new piece! Your creations can hang down from the top, flow around the room creating crazy angles, climb the walls, and twist in graceful, unanticipated shapes!
Experiment with balloon sizes
Mixing balloons of different sizes is an important step towards creating a volumetric and deep composition that draws attention. You surely have the space for creativity. The sizes can range from 5 to 36”.

Stupendous ideas and themes for making a balloon arch
The scenery should always fit the style conception of the event; this is the only way it'll look natural.
How to make your balloon arch look extremely unique? When creating it, think over its shape, types and colors of the balloons, as well as the details that embellish it. In the end, you'll be rewarded with excitement and respect from your guests!
Multiple arches and similar designs look extremely elegant and have a perfect shape. They can zone the space, highlighting the most important gleeful area of the hall. The bottom ends can be attached to the floor, but if you use stands decorated with packets of balloons, fabric, and LED libraries, it will look just magical! You can get a great airy background if you make several bends and place them on top of each other.
Flower arches
Decorating the arch with balloon flowers makes it look fabulous. Similar decorations are applicable for leaves of any theme at a birthday party (both for children and grown-ups), at a matinee in a kindergarten, at a graduation ceremony, first school day, wedding, store opening, etc.
Twisting balloons
Generally, to make arches, round balloons are used. Long balloons are used in limited amounts for creating ornamental details. Try making your arch only from long twisting balloons, it'll look quite unusual.
Man-made cautions
Making a balloon arch is exploratory and delightful. As soon as you understand the nuances of the process, you'll be ready to produce masterpieces that will make any holiday beautiful and unique.
Ask yourself, “Can I make a balloon arch that turns heads?” And we will answer, “Yes, now you can! Go and create your masterpiece!” Balloons Online provide stylish balloons for any occasion at reasonable prices. Check us out at balloons.online!
FAQ
How many balloons do you need for a balloon arch?
The number of balloons depends on the length and density of the arch. On average, you need 80–120 balloons for a standard 2–3 meter arch. For fuller, more textured garlands, the amount can reach 150–200 balloons.
Is it better to use helium or air for a balloon arch?
Air is usually the best choice for balloon arches and garlands. Helium is more expensive, has a shorter float time, and makes the structure harder to control. Air-filled balloons stay in shape longer and are easier to attach to a frame.
What is a common mistake to avoid when making a garland?
A frequent mistake is overinflating balloons. This stretches the latex, makes balloons easier to pop, and disrupts the balanced shape of the garland. Slightly underinflated balloons are more durable and look more uniform.
Can I assemble the balloon garland in advance?
Yes, you can assemble it in advance, usually 24-48 hours before the event. Store the garland indoors, away from heat sources, sharp objects, and direct sunlight to preserve its shape and elasticity.
Can I use my balloon garland outdoors?
Yes, but weather conditions matter. Balloon garlands can be placed outdoors, yet direct sun, wind, and temperature changes can reduce their lifespan. If used outside, place them in the shade and secure the frame properly to prevent movement.


